This document applies to HP and Compaq computers with
Windows 8.
With Windows Easy Transfer, you can transfer your information from
one computer to another, including user accounts, files, folders,
photos, music, and videos, and, depending on the operating system,
email messages, contacts, Windows and Internet settings, and
Internet favorites. Software programs are not transferred.
NOTE: Windows Easy Transfer cannot transfer files
between a 64-bit version of Windows and a 32-bit version of
Windows. Instead, files need to be transferred manually using
external storage devices. To find the version of Windows on your
computer, see the Is
the Windows Version on My Computer 32-bit or 64-bit? support
document.
Transferring files with Windows Easy Transfer in Windows 8.1
You can use Windows Easy Transfer to
transfer information to a computer running Windows 8.1 from
computers with one of the following operating systems:
-
Windows 8
-
Windows RT
-
Windows 7
Windows Easy Transfer cannot back up files on a Windows 8.1
computer for transfer to another computer. To back up and transfer
files from a Windows 8.1 computer, use OneDrive or manually
transfer files using external storage devices.
Step 1: Determining the best transfer method
When transferring files to a Windows 8.1 computer from a Windows
8, Windows RT, or Windows 7 computer, Windows Easy Transfer
supports the following methods:
-
USB flash drive: Each computer must have a USB port.
-
External hard drive: The external hard drive must be compatible with both computers.
To decide which method to use, consider how much information you
are transferring. If you are transferring everything from all
users on the computer, an external hard drive works well. If you
are transferring only a few files or folders, a USB flash drive
works well.
Step 2: Collecting files to transfer from the old computer
Follow these steps on the old computer to
collect the files to transfer to the new computer with Windows
8.1. You must be logged on as an administrator.
Before performing the following steps, disconnect both computers
from the Internet and temporarily disable any firewall software
that might be running.
-
Log on to the old computer.
-
Search for Windows Easy Transfer on the computer.
-
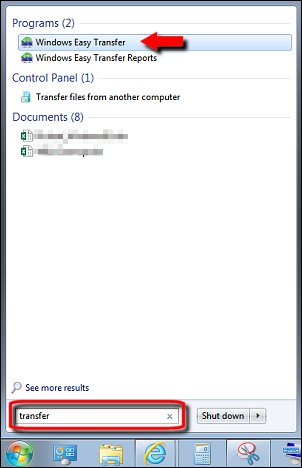
In Windows 7: Click the Start button, type Window Easy Transfer into the search field, and select Windows Easy Transfer from the list of search results.
-
-
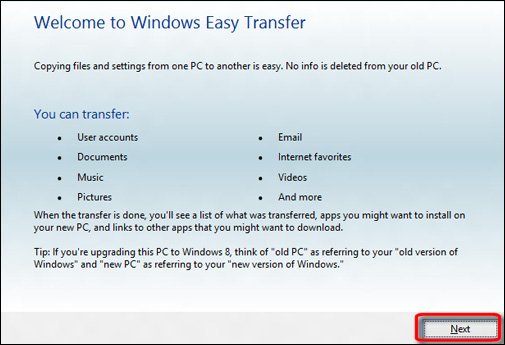
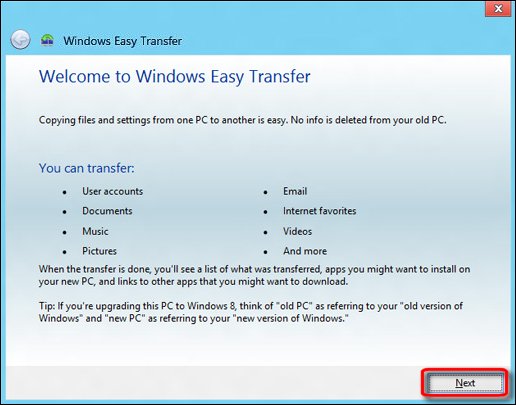
On the welcome screen, click Next.
-
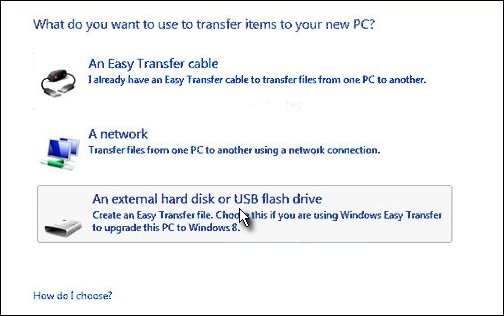
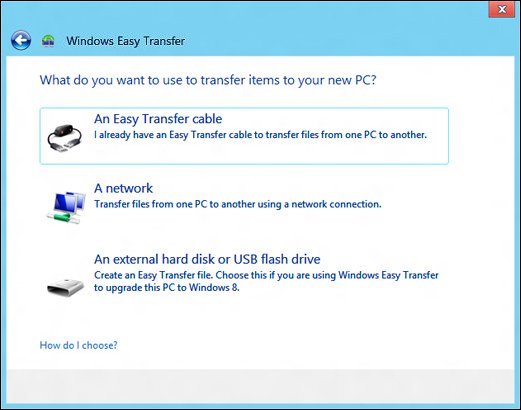
On the What do you want to use to transfer items to your new PC screen, select the An external hard disk or USB flash drive option.
-
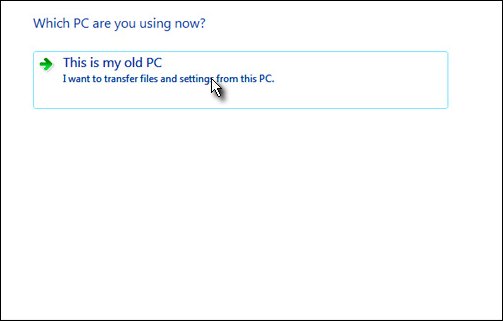
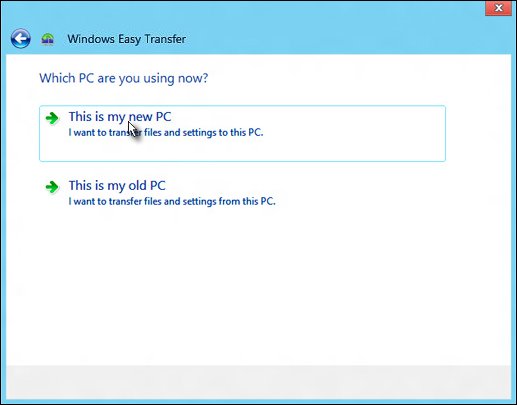
On the Which PC are you using now screen, select This is my old PC.Windows Easy Transfer scans the user accounts to find everything that can be transferred.
-
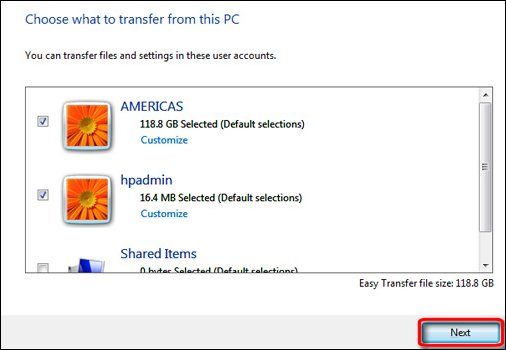
On the Choose what to transfer from this PC screen, select the checkbox next to the items you want to transfer, and then click Next.
-
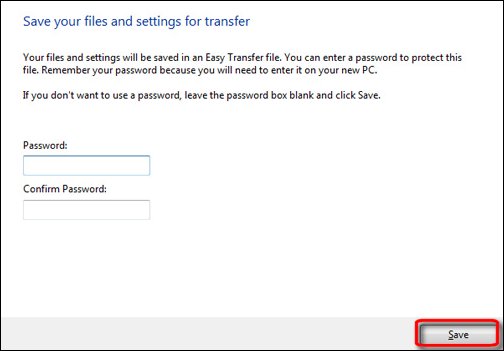
If desired, on the Save your files and settings for transfer screen, type a password to protect the Windows Easy Transfer file, and then click Save.
-
Browse to the location of the external hard drive or USB flash drive that you are using to transfer files, and then click Open.
-
Click Save.
-
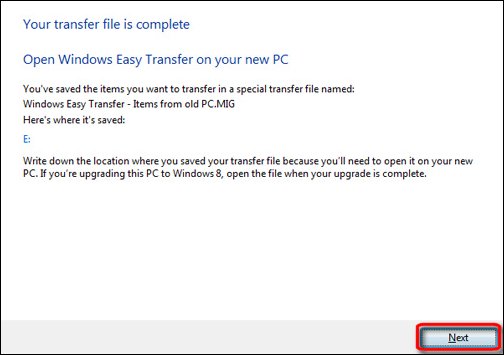
When the transfer is complete, click Next on the Your transfer file is complete screen.
-
Verify that the files are saved to the correct location, and then click Close.
-
Remove the external hard drive or USB flash drive and set it aside until you are ready to transfer the files to the new computer.
-
If you disabled firewall software running on the old computer, re-enable the software.
Step 3: Transferring files to the Windows 8.1 computer
Follow these steps on the new computer to
transfer the files.
-
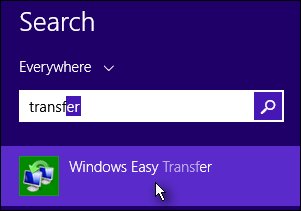
From the Start screen of the new Windows 8.1 computer, type transfer to open the Search charm, and then select Windows Easy Transfer from the search results.
-
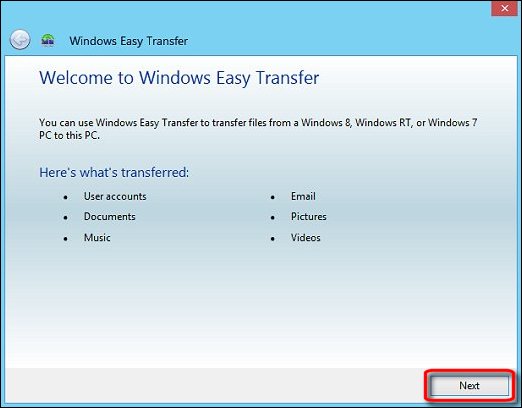
In the Welcome window, click Next to continue.
-
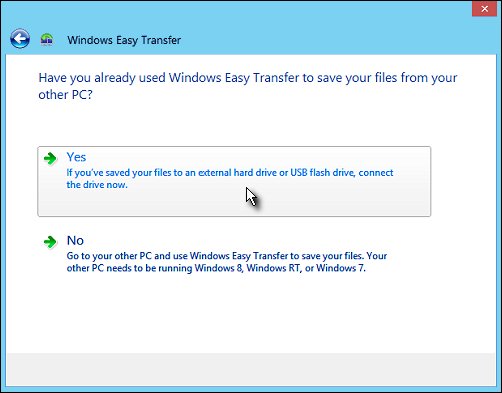
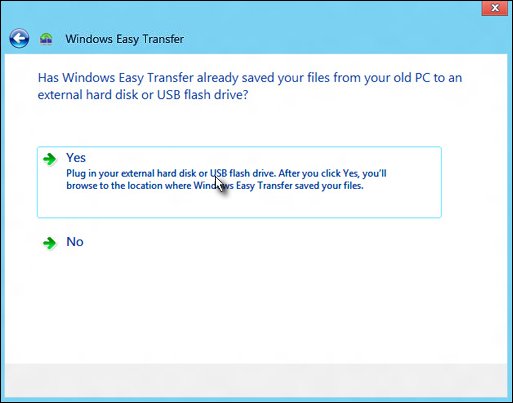
On the Have you already used Windows Easy Transfer to save files from your old PC screen, click Yes.
-
Insert the external hard drive or the USB flash drive used to collect files from the old computer into an available USB port.
-
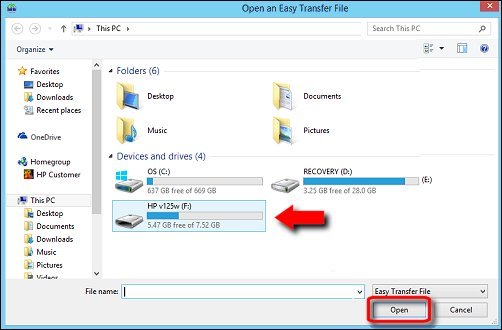
In the Open an Easy Transfer File window, select the external hard disk or USB flash drive that you will be using to transfer items, and then click Open.A list of files stored on the external hard disk or USB flash drive opens.
-
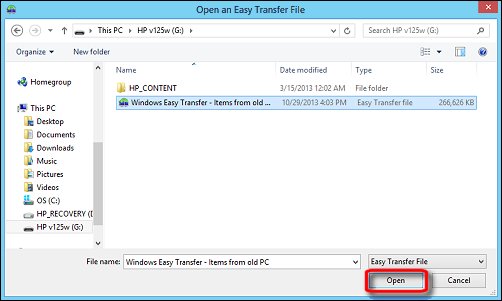
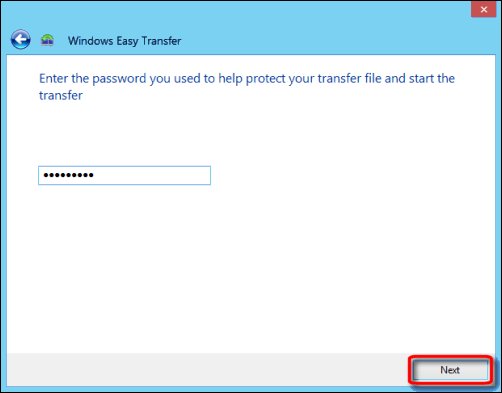
Select the transfer files from the list, and then click Open.If prompted, enter the password used to protect your transfer file, and then click Next.
-
Read and respond to any onscreen messages.
-
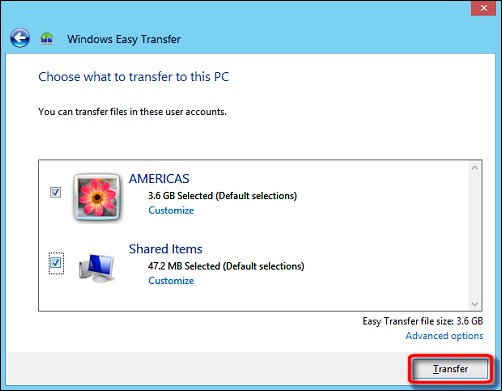
On the Choose what to transfer to this PC screen, select the user accounts to transfer, and then click Transfer.
-
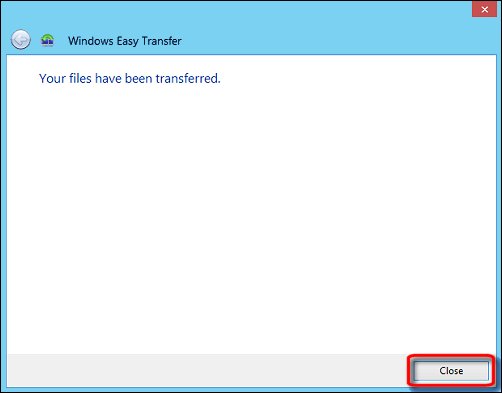
Once the file transfer is complete, click Close on the Your files have been transferred screen.
-
Remove the external hard disk or USB flash drive from the computer and store it in a safe place.
-
If you disabled firewall software running on the new computer, re-enable that firewall software.
Step 4: Locating transferred files on the Windows 8.1 computer
User accounts transferred from the old computer will now be on
the new Windows 8.1 computer. Follow the steps below to find
transferred files.
-
Log on to the new computer using the account that was transferred from the old computer.
-
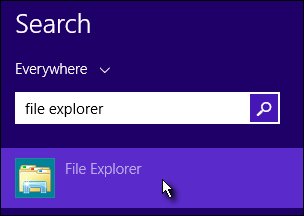
From the Start screen, type file explorer to open the Search charm, and then select File Explorer from the search results.
-
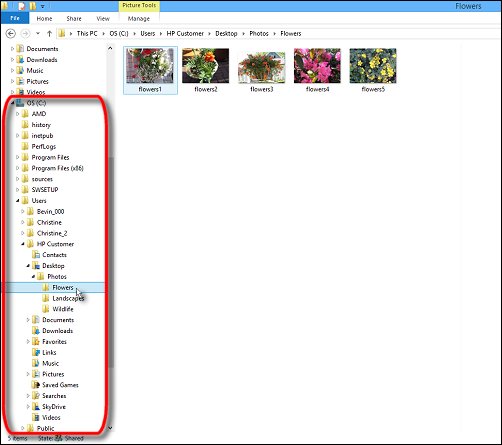
In File Explorer, click the small triangle next to This PC to expand the list.
-
Under This PC, look in the folders to find your files. If you can't find your files, perform the following steps:
-
Under This PC, click the small triangle next to OS (C:) to expand the list.
-
Click the small triangle next to Users to expand the list.
-
Click the small triangle next to the name of the profile that was transferred.
-
Look in the folders to find your files.
-
If desired, double-click the files to open them.
-
Step 5: Adding apps that you own to the new computer with Windows 8.1
If you are transferring files from a Windows 8 computer, follow
the steps below to add your apps to the new computer.
-
Log on to the new computer using the account that was transferred from the old computer.
-
On the Start screen, click the Store tile.
-
In the Windows Store, right-click any blank area.
-
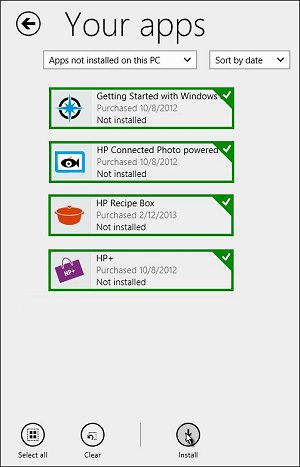
Click Your apps in the upper-left area of the screen.A list of apps owned by the account-holder opens.
-
Right-click each app that you want to reinstall, or click Select all, and then click Install.
-
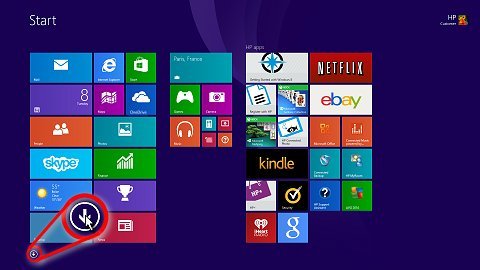
On the Start screen, click the down arrow in the lower-left area of the screen to open a list of apps.
-
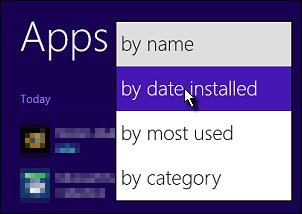
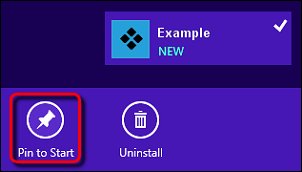
Click the down arrow next to Apps by name, and select by date installed from the drop-down list.The newly installed apps will appear first on the list. The word NEW will appear next to the app tile.
-
Right-click the apps that you want to pin to the Start screen, and click the Pin to Start icon in the lower-left corner of the screen.
Transferring files and settings with Windows Easy Transfer in Windows 8
Windows Easy Transfer supports several methods to transfer your
files and settings.
You can use Windows Easy Transfer to transfer information to a
computer running Windows 8 from computers with one of the
following operating systems:
-
Windows 8
-
Windows 7
-
Windows Vista
-
Windows XP Service Pack 2 (SP2) or Service Pack 3 (SP3)
NOTE: Windows Easy Transfer cannot transfer files
between a 64-bit version of Windows and a 32-bit version of
Windows. Instead, files need to be transferred manually using
external storage devices. To find the version of Windows on your
computer, see the Is
the Windows Version on My Computer 32-bit or 64-bit? support
document.
Step 1: Determining the best transfer method
When transferring files between Windows XP, Windows Vista,
Windows 7, or Windows 8 computers, choose a method that works on
both computers. Windows Easy Transfer supports the following
transfer methods:
-
USB flash drive or external hard drive: To use a USB flash drive, you need a USB port on each computer. If you use an external hard drive, it must be compatible with both computers.
-
Easy Transfer Cable: You need a special USB cable designed to work with Windows 8 and Windows Easy Transfer, and a USB port on each computer. If you do not have an Easy Transfer Cable, you can order one online or get one at an electronics store. The Easy Transfer Cable is supported on Windows XP, Windows Vista, Windows 7, and Windows 8 computers.
 NOTE:A standard USB cable cannot be used to transfer files and settings between computers.
 -
Network: Both computers need to be connected to the same wired or wireless network and both computers must be able to share files and folders.
To decide which method to use, consider how much information you
are transferring. If you are transferring everything from all
users on the computer, or all of your user account files, an
Easy Transfer Cable, external hard drive, or a network works
well. If you are transferring only a few files or folders, a USB
flash drive works well.
Step 2: Opening Windows Easy Transfer on the new computer in Windows 8.1
Complete the following steps on the new Windows 8
computer to open Windows Easy Transfer. You must be
logged on using an administrator account.
NOTE:Before performing the following steps,
disconnect both computers from the Internet and temporarily
disable any firewall software that might be running.
-
From the Start screen, type transfer to open the Search charm, and then select Windows Easy Transfer from the search results.
-
On the welcome screen, click Next to continue.
-
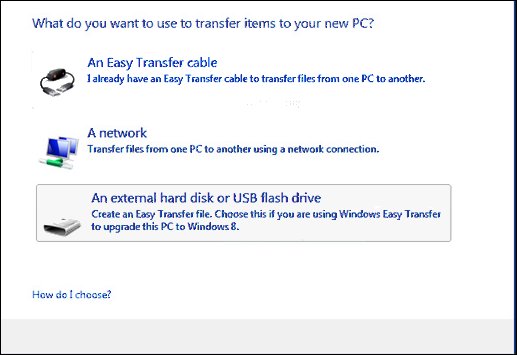
On the What do you want to use to transfer items to your new PC window, select the method to use to transfer items.
-
An Easy Transfer cable: A special USB cable you can purchase to transfer files from one computer to another. You cannot use a regular USB cable to transfer files with Windows Easy Transfer.
-
A network: Transfer files over a network.
-
An external hard disk or USB flash drive: Use the storage space on an external hard drive or a USB flash drive.
-
-
On the Which PC are you using now window, click This is my new PC.
-
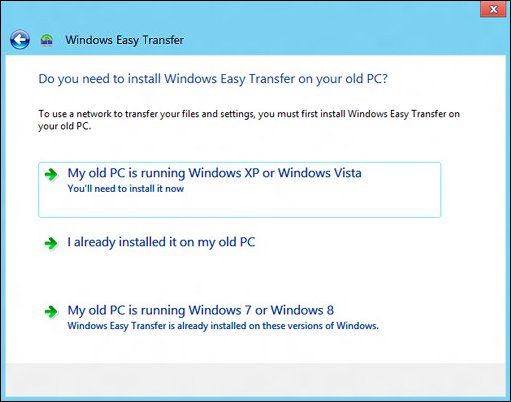
In the Do you need to install Windows Easy Transfer on your old PC window, choose whether to install Windows Easy Transfer on the old computer.
-
If your old computer uses Windows XP or Windows Vista, click My old PC is running Windows XP or Windows Vista. Continue with the next step.
-
If you have already installed Windows Easy Transfer on the old computer, click I already installed it on my old PC. Skip this section and proceed to Collecting files and settings from the old computer .
-
If your old computer uses Windows 8 or Windows 7, click My old computer is running Windows 7 or 8. Skip this section and proceed to Collecting files and settings from the old computer .
-
-
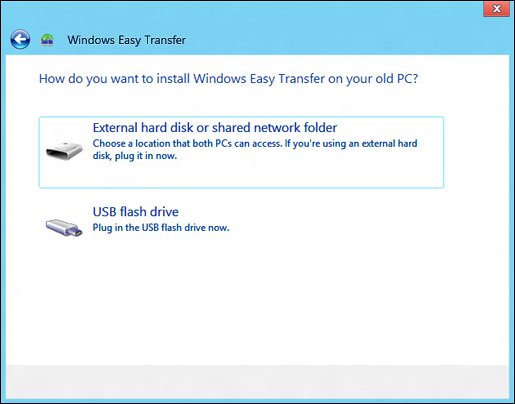
On the How do you want to install Windows Easy Transfer on your old PC screen, select the location to save the Windows Easy Transfer files to install on your old computer. If using an external hard disk or a USB flash drive, plug the external hard disk or a USB flash drive into the new computer, and then make the selection.
-
Follow the onscreen instructions for the method you are using.
-
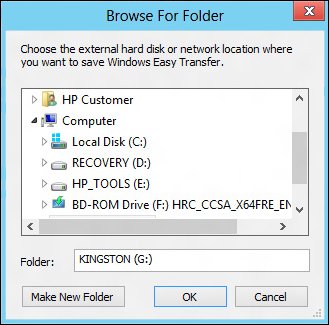
Browse to the folder on the external hard disk, network, or USB flash drive to save the Windows Easy Transfer files, and then click OK.Windows Easy Transfer copies the files and displays the progress on the screen.
-
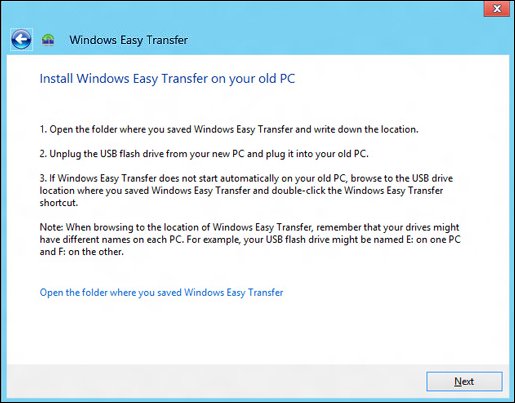
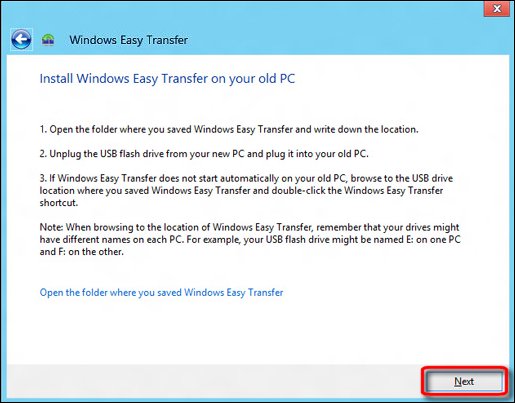
When Windows Easy Transfer is done copying the files, a window opens instructing you to install Windows Easy Transfer on the old computer.
 NOTE:Do not click Next until you have Installed Windows Easy Transfer on your old computer and saved the files to transfer to the new computer.
 -
If using an external hard disk or USB flash drive, remove it from the computer.
Step 3: Install Windows Easy Transfer on the old computer (Windows XP and Vista only)
If your old computer uses Windows 8 or Windows 7, skip this
section and proceed to Collecting
files and settings from the old computer .
Complete these steps on the old computer to
install Windows Easy Transfer from an external hard drive,
network drive, or USB storage device.
-
If you are using a USB storage device or external drive, connect it to the computer now.
-
In Windows Explorer or File Explorer, browse to the external hard drive, network drive, or USB storage device.
-
Double-click the external hard drive, network drive, or USB storage device.
-
When the installation has finished, go to the next step.
Step 4: Collecting files and settings from the old computer
After you have installed Windows Easy Transfer on the old
computer (not necessary if the old computer is running Windows 8
or Windows 7), follow these steps on the old computer
to collect the files and settings to transfer to the new
computer.
-
In the Welcome window, click Next.
-
In the next window, select the method to use to transfer items:
-
An Easy Transfer cable: A special USB cable you can purchase to transfer files from one computer to another. You cannot use a regular USB cable to transfer files with Windows Easy Transfer.
-
A network: Transfer files over a network.
-
An external hard disk or USB flash drive: Use the storage space on an external hard drive or a USB flash drive.
-
-
Select This is my old PC.Windows Easy Transfer scans the user accounts to find all the files and settings that can be transferred.
-
Select the items to transfer. When complete, click Next.If you want to protect the Windows Easy Transfer file with a password, on the Save your files and settings for transfer screen, enter a password, and then click Save.
-
Browse to the location on the network drive, external hard disk, or USB flash drive to save the transfer file, and then click Open.
-
Click Save.
-
On the Your transfer file is complete screen, click Next.
-
Verify that the files are saved to the correct location, and then click Close.
-
If you disabled firewall software running on the computer, re-enable that firewall software.
Step 5: Transferring files and settings to the new computer
Follow these steps to transfer the files and settings to a
computer running Windows 8.1.
-
Do one of the following, depending on how you are transferring the files and settings:
-
Connect the Easy Transfer cable to both computers.
-
Plug the USB flash drive or external hard drive into the new computer.
-
Using the new computer, browse to the network folder where you saved the transfer file.
-
-
The Windows Easy Transfer window should still be open on the new computer. If it is not, open Windows Easy Transfer again and click Next.
 NOTE:The following instructions are based on transferring data from a computer using Windows Vista to a computer using Windows 8 with a USB flash drive. If you are using different versions of Windows or a different transfer method, your screens may be different.
 -
On the next page, click Yes.
-
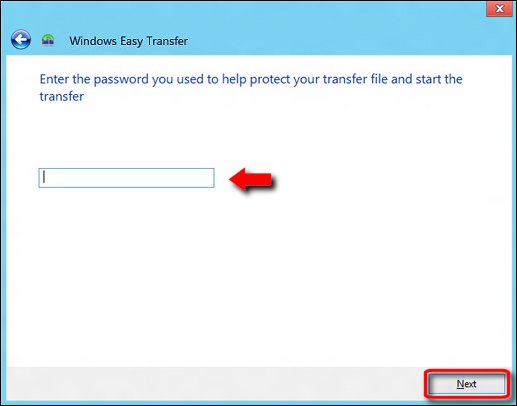
Browse to the Windows Easy Transfer file. Click the Windows Easy Transfer file, and then click Open.If you used a password when you saved the transfer file, enter the password, and then click Next.
-
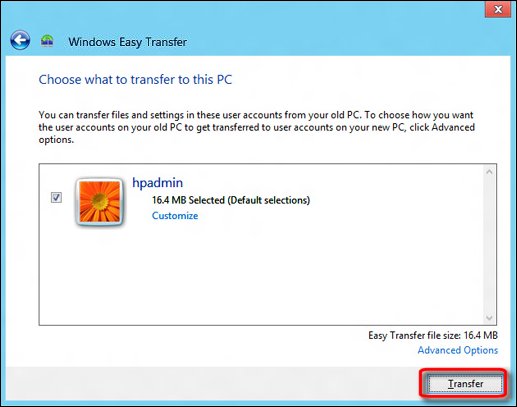
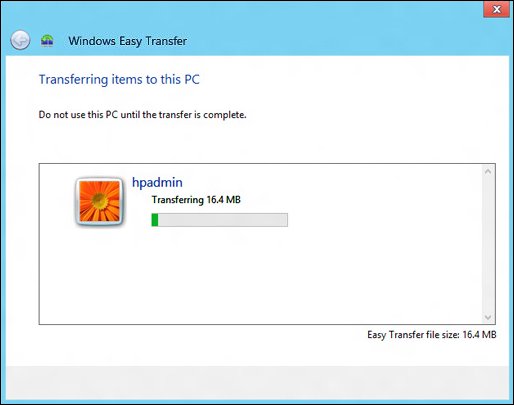
Select the user accounts to transfer, and then click Transfer.Windows Easy Transfer transfers the files and settings to the new computer.
-
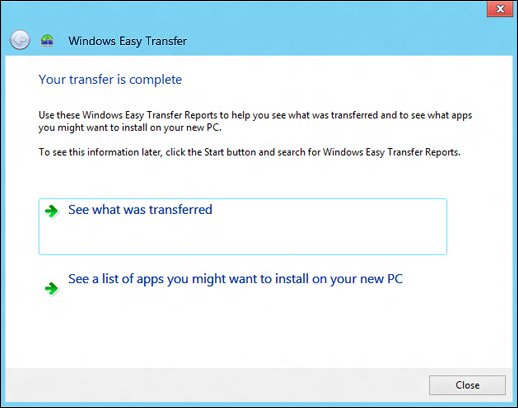
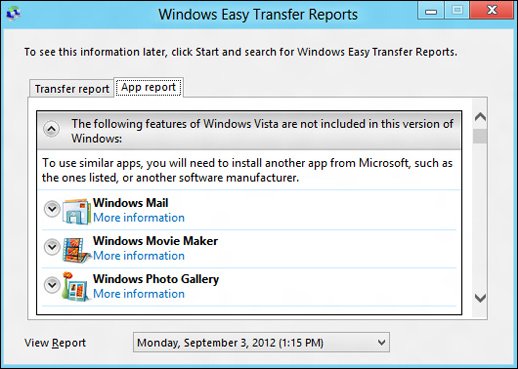
When the transfer is complete, follow the instructions below to view a report of the files that were transferred or a list of apps that you might want to install on the new computer.
-
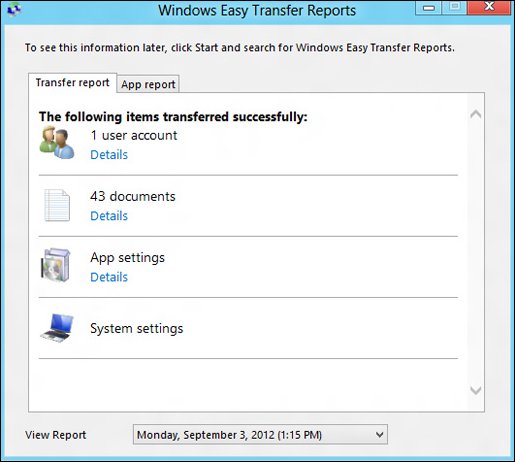
On the Your transfer is complete screen, click See what was transferred to view a transfer report listing the files and settings that were transferred.Windows Easy Transfer Reports screen opens on the Transfer report tab.
-
-
If you disabled firewall software running on the computer, re-enable that firewall software.
 Windows Easy Transfer 7 - 8 - 8.1